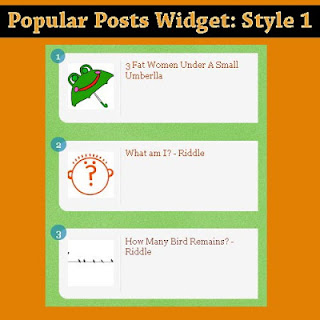
99 of the 100 blogger bloggers are familiar with the blogger's official popular post widget. The widget enables you to show the most viewed posts on your blog. Placing a popular post widget somewhere on your blog helps your visitors to find out the best posts on your blog. On the other hand helps you to decrease bounce rate of your blog. But the default style of the popular post widget is bit boring and wont catch the attention of the visitors that much. However we can simply customize the popular post by adding some CSS codes directly to our template. So lets start customizing the popular post widget.
Screen Shot:
Adding Popular Post Widget To Your Blogger Blog:
1. Go to your blogger dashboard > Layout.
2. Click 'Add a Gadget' and select the 'Popular Post' widget within the list:
3. Now make the selections like what is shown below.
4. Now click the orange save button.
Customizing Blogger's Official Popular Post Widget:
1. Once again move on to Blogger > Template > Edit HTML:
2. Using CTRL+F search for ]]></b:skin>
3. Just above it paste the following code:
.popular-posts ul li{
position: relative;
float: left;
margin: 1em 0;
width: 100%;
height: 100%;
background: #f5f5f5;
border: 1px solid #eee;
border-right: none;
border-radius: 1em 0 0 1em;
-webkit-border-radius: 1em 0 0 1em;
-moz-border-radius: 1em 0 0 1em;
box-shadow: inset 1px 1px 0 #fff;
-webkit-box-shadow: inset 1px 1px 0 #fff;
-moz-box-shadow: inset 1px 1px 0 #fff;
}
.popular-posts ul li:before {
position: absolute;
top: -0.5em;
left: -1em;
padding: 0.25em 0.6em;
background: #1f8bb0;
color: #fff;
font-weight: bold;
border-radius: 1em;
-webkit-border-radius: 1em;
-moz-border-radius: 1em;
opacity: 0.7;
filter: alpha(opacity=70);
}
.popular-posts .item-thumbnail {
float: left;
position: relative;
height: 75px;
width: 75px;
margin: 0 0.5em;
padding: 0.5em;
border-right: 1px solid #e0e0e0;
box-shadow: inset -1px 0 0 #fff;
-webkit-box-shadow: inset -1px 0 0 #fff;
-moz-box-shadow: inset -1px 0 0 #fff;
}
#PopularPosts1 ul li:first-child + li + li + li + li + li + li + li:before{content:"8"}
#PopularPosts1 ul li:first-child + li + li + li + li + li + li + li + li:before{content:"9"}
#PopularPosts1 ul li:first-child + li + li + li + li + li + li + li + li + li:before{content:"10"}
#PopularPosts1 ul li:first-child + li + li + li + li + li:before{content:"6"}
#PopularPosts1 ul li:first-child + li + li + li + li + li + li:before{content:"7"}
#PopularPosts1 ul li:first-child + li + li + li + li:before{content:"5"}
#PopularPosts1 ul li:first-child + li + li + li:before{content:"4"}
#PopularPosts1 ul li:first-child + li + li:before{content:"3"}
#PopularPosts1 ul li:first-child + li:before{content:"2"}
#PopularPosts1 ul li:first-child:before{content:"1"}
4. Now just click the orange 'Save template' button
That's it! Now you have a cool popular widget on your blog! Feel free to share your views through the comment box below!
By the way as the title shows, this is 'style 1' and more styles are on the way... if you wish to stay connected with us, then please subscribe to our updates by registering your mail id here.
By the way as the title shows, this is 'style 1' and more styles are on the way... if you wish to stay connected with us, then please subscribe to our updates by registering your mail id here.


Really Great Widget :)
ReplyDeleteRegards:
Syed Bahadur Shah
Thanks Man:)
Deletethis works , thanks for adding this to your blog
ReplyDeleteIts very helpful for me and i added it to my blog i will back to visit the page often
Thank you